
In this era of technological improvements and advancements, we as parents find ourselves helpless and compelled before our children. But the same technology allows us to take control of what our children can access and what not. All it requires is a handful of knowledge and awareness about the systems and technology.
To keep vigilance and control on children, parents often prefer buying Apple devices for every member of the household. Because Apple allows parental controls in iOS that hardly any other version or smart gadget does. By simply setting up family sharing options you can take full control of your child’s or any household member’s device the way you want.
This article will serve as a summarized guide for parents who want to quickly set up family sharing accounts for their children so that they can view what their children are up to on their devices and apply limits and restrictions to apps, features or websites that they don’t want their children to access.
Here is the whole job in one sentence: put your child’s Apple Account into your Family Sharing group, turn on Screen Time for that child from your own iPhone, switch on Content & Privacy Restrictions, and lock the lot behind a Screen Time passcode your child does not know. Everything after that is tuning, and every later change is made on your phone rather than theirs.
It is worth a quarter of an hour. Common Sense Media’s most recent census puts entertainment screen time for eight-to-twelve-year-olds at close to five hours a day and for teenagers at roughly eight, excluding schoolwork. Apple’s tools hand you the levers — time, content, contacts, purchases and location. The ten steps below run easiest first, and the first four do most of the work.
What Each Parental Control Actually Does
| Control | What it actually does | Where it lives |
|---|---|---|
| Family Sharing | Links up to six people so one adult can manage children’s accounts, purchases and storage | Settings → your name → Family |
| Child Account | Applies age-based safeguards automatically; required for younger children, available to 18 | Settings → Family → Add Member |
| Čas pred obrazovkou | The weekly use report, plus every time limit below | Settings → Screen Time |
| Downtime | Blocks apps and notifications on a schedule | Screen Time → child → Downtime |
| App Limits | Caps daily minutes for one app or one category | Screen Time → child → App Limits |
| Always Allowed | Apps that keep working during Downtime | Screen Time → child → Always Allowed |
| Communication Limits | Decides who can call, message or FaceTime the child, and when | Screen Time → child → Communication Limits |
| Communication Safety | Blurs nudity in photos and video before a child views or sends them | Screen Time → child → Communication Safety |
| Sensitive Content Warning | Blurs explicit images arriving on the device and offers a way to get help | Settings → Privacy & Security |
| Content & Privacy Restrictions | Age ratings, web filtering, explicit language, Game Center, purchases, privacy | Screen Time → child → Content & Privacy Restrictions |
| Ask to Buy | Sends every purchase and free download to a parent for approval | Settings → Family → child → Ask To Buy |
Step 1: Understand & Setup The Family Sharing Option
By setting up family Sharing you can add up to six family members and they can share Apple Books, An App Store Purchase, iTunes, an iCloud storage plan or an Apply Music Family Subscription without having to share accounts. This allows the entire family to experience, benefit and digitally live under one roof without facing the trouble of purchasing separately. The family sharing feature allows parents to let their kids spend money by using their devices remotely. A single credit or debit card or a PayPal account set up in the parents’ device can be used by every family member to make purchases. While some common features include sharing screens, calendars, updates, alarms that will be similar for everyone in the family so that everyone is on the same page.
First Things First.
Make a note that every individual can enjoin one family at a time. As no individual can be part of two families. You need to make sure that you have the following before setting up the family sharing account.
- It is necessary to have an Apple ID logged into iTunes and iCloud
- The devices that entertain family sharing are iPhone, Mac (OS X Yosemite and other updated OS), iPad, iOS 8 at least as the earlier versions don’t support family sharing
- For every family member and child, it is compulsory to have an Apple ID so that they can be added to the family group by the parent’s device
Add two things to that list. A child needs their own Apple Account, and for a younger child it should be a Child Account: Apple requires one under 13 in most countries, rising to 14 in mainland China and South Korea, 15 in France, and 16 in Germany, Ireland and the Netherlands, with Child Accounts available up to 18. Second, the App Store now grades apps at 4+, 9+, 13+, 16+ and 18+, so anything above your child’s band never appears as an ordinary download. Ask to Buy is on by default under 13.
Step 2: Set Up Family Sharing on Your iPhone
The process of setting up a Family sharing
1. Select or touch the Settings and select your Apple ID. If you’re using iOS 27, tap Family.
2. Select the option that says ‘Set Up Family Sharing’ and then selects “Get Started”. You will see some instructions to set up your family sharing account just follow them and start adding family members.
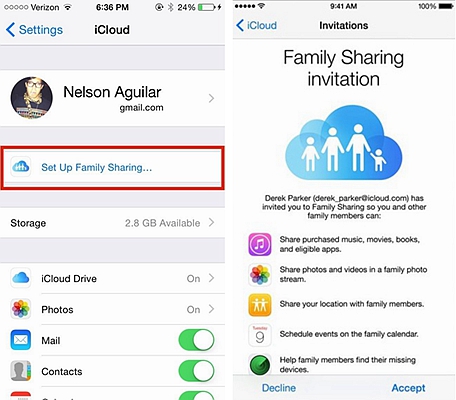
On current software those two taps are Settings → Family → Set Up Family Sharing. Whoever starts the group is the organizer, invites everyone else, and is billed for purchases while Purchase Sharing stays on.
Step 3: Invite Children to Join Your Family
3. Invite children to join your family
Once your children or a family member has an Apple ID you can simply add them to the family sharing account.
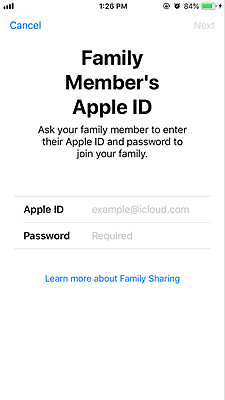
Just follow the below mentioned simple steps to have your children added to the group, provided, they have Apple IDs.
You can use the ‘Family Sharing’ option directly if you have enabled the feature on your iPhone or iPad.
1. Tap the Settings options select your name then select Family Sharing.
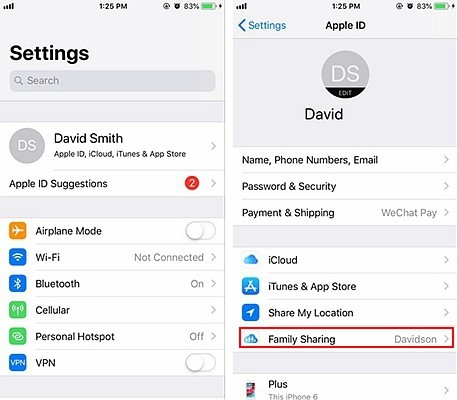
2. Select the option that says “Add Family Member”.

3. Just type the child’s E-mail ID or Name and do as the instructions require.
4. A parent can either send messages to different IDs for accepting the family group request or invite them in person as well.
If your child has no Apple Account, stay on that screen and choose Create Child Account: enter their name and date of birth and follow the prompts. Sign in to the new account on your child’s device when setup finishes.
Step 4: Get Hold of Your Children’s Devices by Setting up Screen Time
The feature is popularly known by the term “Screen Time” where apple allows a unique and tough method of parental control. This is built into iOS, where parents can enjoy the liberty of live monitoring their children’s virtual activities and bar their children’s devices to operate certain features. Parents can set up parameters to the time their children are consuming on their iOS devices.
But you need to be aware of the fact that Screen Time feature is only usable if you have subscribed to the family sharing membership and your children are the part of your family sharing group. With the help of family sharing settings, you can exercise all the parental control features from live monitoring to restricting.
If you wish to limit or restrict a specific app or feature in your kid’s iPhone or any iOS device then simply Tap settings and select screen time. Then continue and select either “This is my iPhone or This is My Child’s iPhone” Option to do the needful.
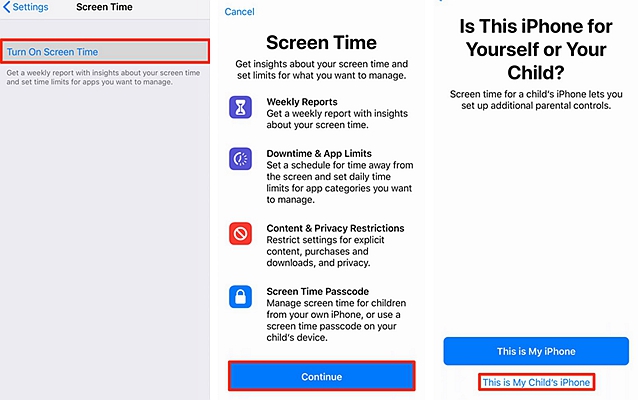
Any parent can use family sharing to integrate, customize or control features of their children’s device once they have two things;
1. Family sharing subscription.
2. Children are added to the family sharing group.
Working from your own phone is the better route: Settings → Family → the child’s name → Screen Time, then follow the prompts for Downtime, App Limits, content ratings and communication.
Step 5: Lock the Settings With a Screen Time Passcode
To keep your children from changing the settings you can set up a password to enter the settings so that only you can access the settings section of the devices.
That password is the Screen Time passcode, and it is not the device passcode. Pick four digits your child cannot guess and accept Screen Time Passcode Recovery when offered — skip it and a forgotten code ends with a full erase of the device. Two toggles matter just as much: Block at End of Limit inside App Limits, and Block at Downtime inside Downtime. Leave either off and a hard stop becomes a suggestion.
Step 6: Set Downtime, App Limits and Always Allowed
Open Settings → Screen Time → your child’s name under Family and work down the Limit Usage section.
- Downtime blocks apps and notifications on a schedule, say 9pm to 7am. Turn on Scheduled, choose Every Day or Customize Days, then turn on Block at Downtime.
- App Limits caps one app or one category. Tap Add Limit, choose Social, Games or a single app, set the duration, and turn on Block at End of Limit.
- Always Allowed lists what survives Downtime, usually Phone, Messages and Maps. Every app added here is a hole in the schedule, so keep it short.
- Screen Distance nudges a child holding the phone too close, and is on by default for child accounts in most regions.
Category limits are pooled: sixty minutes of Social is shared across every social app, not sixty each, and they reset at midnight in the device’s time zone. A child who runs out can ask you for more.
Step 7: Turn On Content & Privacy Restrictions
Content & Privacy Restrictions is the switch that makes everything below it real: Settings → Screen Time → your child’s name → Content & Privacy Restrictions, enter the passcode, turn it on.
Screen Time and Content & Privacy Restrictions settings map
| What you want to control | Path from Settings → Screen Time → child’s name | Sensible choice |
|---|---|---|
| App age ceiling | Content & Privacy → App Store, Media, Web, & Games → Apps | 4+, 9+, 13+, 16+ or 18+ |
| Music, podcasts, news, fitness | App Store, Media, Web, & Games → matching row | Clean |
| Films and TV | App Store, Media, Web, & Games → Movies / TV Shows | Match the app ceiling |
| Web browsing | App Store, Media, Web, & Games → Web Content | Obmedziť webové stránky pre dospelých |
| Explicit language and Siri | App Store, Media, Web, & Games → Siri | Don’t Allow |
| Multiplayer and friends | App Store, Media, Web, & Games → Game Center | Allow with Friends Only |
| Installing, deleting, in-app purchases | Content & Privacy → iTunes & App Store Purchases | Don’t Allow |
| Safari, Camera, AirDrop and other built-ins | Content & Privacy → Allowed Apps & Features | Toggle off what you do not want |
| Location, contacts, photos, accounts | Content & Privacy → Privacy | Don’t Allow Changes |
| Purchase approval | Settings → Family → child → Ask To Buy | Zapnuté |
| Sensitive images on the device | Settings → Privacy & Security → Sensitive Content Warning | Zapnuté |
Web Content offers Unrestricted, Limit Adult Websites with your own Never Allow list, and Only Approved Websites — an allowlist that suits a young child far better than a teenager doing homework. Neither mode reaches an in-app browser.
Age-based recommendations
| Child’s age | App ceiling | Web content | Who they can talk to | Time |
|---|---|---|---|---|
| Under 5 | 4+ | Only Approved Websites | Contacts Only, you manage the list | Short allowance, fixed Downtime |
| 6–9 | 9+ | Obmedziť webové stránky pre dospelých | Contacts Only | Downtime from bedtime, limits on games |
| 10–12 | 13+ | Limit Adult Websites with a Never Allow list | Contacts Only, approve each new contact | Limits on games and social |
| 13–15 | 16+, or 13+ if you judge them ready | Limit Adult Websites or Ask to Browse | Contacts & Groups with at Least One Contact | Negotiated limits, Ask to Buy on |
| 16–17 | 18+ | Unrestricted or Ask to Browse | Everyone, or Contacts Only | Self-managed, checked against reports |
When you set up a device for a child under 18, Communication Safety and web content limits come on by default; that age varies by country and region.
Step 8: Prevent From Unwanted App Store Purchases
Now with the help of this “Screen Time” feature you can easily restrict your children’s device to purchase Apps you don’t want them to. You can bar them from Uninstalling Apps or Installing Apps as per your preference. The app is in their device can be prevented from access only if you wish to. On the top you can set restrictions followed by age group and the smart AI plugins will automatically detect who to stop and who not to.
You can prevent your child or a family member in the family sharing group from purchasing iTunes or Apps by following the below-mentioned steps;
1. Select settings and enter the Screen Time feature.
2. Select content and privacy restrictions. Then select iTunes and App store purchases.
3. Click the setting’s icon and mark the Don’t Allow option.

While after Step # 3 you can select either “Always require or Don’t Require” option to create a password-protected iTunes & App Stores Purchases.
Ask to Buy is the softer, usually better version of the same idea: Settings → Family → your child’s name → Ask To Buy, after which every purchase, free download and in-app purchase arrives on your phone for approval. Set In-App Purchases to Don’t Allow underneath it if a free game has ever turned into a bill.
Step 9: Set Communication Limits, Communication Safety and Sensitive Content Warning
Communication Limits decide who can reach your child. From their Screen Time screen tap Communication Limits, set During Screen Time to Contacts Only, and set During Downtime to Specific Contacts so only a few people get through at night. Turning off Allow Contact Editing stops names being added behind your back.
Communication Safety blurs nudity in photos and video before a child views or sends them in Messages, AirDrop and FaceTime, then offers the child a way to get help. It is on by default when a device is set up for a child under 18. Sensitive Content Warning is the close cousin in Settings → Privacy & Security on the device itself, and is worth switching on even for a teenager. Neither sends you a notification when something is intercepted — the point is to protect the child.
Step 10: View Children’s Live Location
To enhance the parenthood authority this Screen Time feature also allows you to view your children’s live location and all the places they have been to.
For viewing your child’s location at any time simply turn on the location services feature by accessing your children’s device via screen time and then tap Share My Location.
If you are hyper-conscious about your children, you can even bar him or her to change the account settings or choose to turn their devices on Do Not Disturb when you know they must be driving.
You read that location from the Find My app on your own iPhone. To stop the toggle being flipped, set Content & Privacy Restrictions → Privacy → Share My Location to Don’t Allow Changes. The driving mode is now called Driving Focus; lock it behind the passcode so it cannot be dismissed at the wheel.
What These Controls Genuinely Cannot Do
- Web filtering works on known adult sites and misses plenty, and it never reaches an in-app browser.
- Screen Time reports minutes, not meaning. You will see that an app was open for two hours, not what happened inside it.
- An age rating is a publisher’s declaration. Chat inside a 12+ app can expose a child to more than a 17+ single-player game.
- Communication Safety protects the child but does not tell you.
- A determined teenager has options — a friend’s phone, a web app, a device reset. The passcode makes the obvious routes harder, not impossible.
- None of it replaces talking: co-viewing and agreeing rules together beats restriction alone.
अक्सर पूछे जाने वाले प्रश्नों
1. Do I need Family Sharing before any of this works?
Yes, for anything that manages a child’s device. Screen Time runs on a single phone, but setting limits from your device, approving purchases and managing contacts all need the child’s Apple Account inside your family group.
2. At what age does Apple require a Child Account?
Under 13 in most countries and regions, with higher thresholds elsewhere: 14 in mainland China and South Korea, 15 in France, 16 in Germany, Ireland and the Netherlands. Child Accounts are available up to 18.
3. Can my child switch the restrictions off?
Not without the Screen Time passcode. Keep it different from the device passcode, and turn on Block at End of Limit and Block at Downtime — without them a child taps Ignore Limit and carries on.
4. Does Ask to Buy cover in-app purchases?
It covers purchases and free downloads through the App Store. Separate switches under iTunes & App Store Purchases block installing, deleting and in-app purchases outright.
5. Can I set different limits for weekends?
Both Downtime and App Limits offer Customize Days. Category limits are pooled across the apps in that category and reset at midnight in the device’s time zone.
6. What if I forget the Screen Time passcode?
With Screen Time Passcode Recovery enabled you reset it using your Apple Account. Without it, the only way back in is to erase the device and set it up again.
Záver
Parental controls on an iPhone are not one switch, which is why so many parents give up halfway. They are a short chain: Family Sharing first, then a Child Account for anyone young enough to need one, then Screen Time, then Content & Privacy Restrictions, then a passcode your child does not have. Miss the passcode and the rest is decoration.
The order here is deliberate. Steps 1 to 4 build the structure in about a quarter of an hour, and steps 5 to 10 are the tuning you return to as your child gets older and earns more room. Revisit the settings twice a year — a limit that suited a nine-year-old is nonsense for a thirteen-year-old, and a child who has never helped negotiate a limit has not learned to manage one.
Two honest expectations close this out. These tools bound the problem rather than solve it: they cap time, filter known content, gate purchases and show you where a device is, and they will not tell you what your child typed inside an app. And pediatric guidance has shifted for good reason, away from counting minutes and towards what screen time displaces — sleep, movement, homework and people in the same room. Set the controls, then keep talking.
Aký užitočný bol tento príspevok?
Kliknite na hviezdičku a ohodnoťte to!
Priemerné hodnotenie / 5. Počet hlasov: